“EZ KIT” Copper Moonshine Still — YOU SOLDER
FREE SHIPPING TO CONTINENTAL USA — PRICE INCLUDES SHIPPING COST
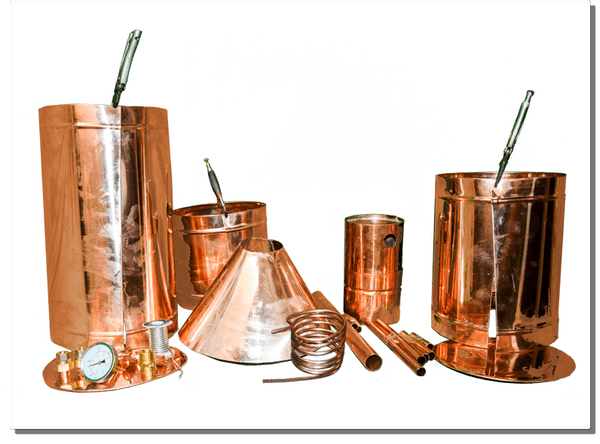
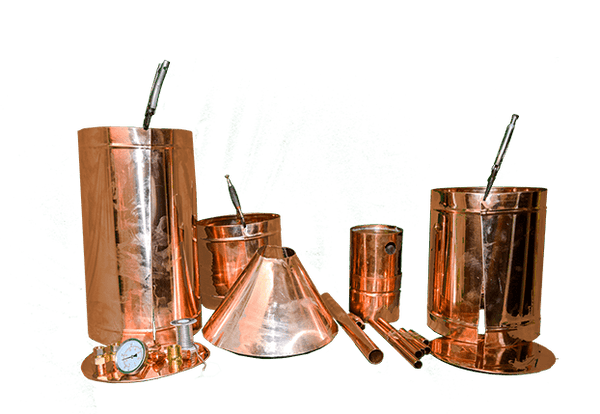
Advanced Model EZ KIT: Stainless EZ Seal Cap on the pot + 4" Fruit Port on the 3 Gallon Thumper. You clamp, solder, and finish the build.
Key Features (EZ KIT)
- YOU SOLDER DIY KIT — pre-cut, rolled, and embossed 20 oz copper ready to clamp & solder.
- Includes Solder & Flux — copper fittings, pipe, ferrules, gaskets, and hardware to complete the build.
- Advanced Add-Ons Included — Stainless EZ Seal Cap on pot + 4" Thumper Fruit/Access Port (tri-clamp set).
- Complete Setup — Varied Sized Pot, 3 Gallon Thumper, 3 Gallon Worm, 3/8" Copper Coil, Temperature Gauge.
- Heavy-Gauge Copper — 20 oz (22 ga.) 99.9% pure copper sheet.
- American-Made Kit — cut, formed, and packed in the USA by American Copper Works.
- Lifetime Warranty on copper components once assembled correctly.
Why Choose an EZ KIT?
Build ACW quality at a lower cost. We do the precision cutting, rolling, and embossing — you do the clamping and soldering for a rock-solid, leak-free still you’ll be proud of.
Detailed Technical Specifications
| Component | Details |
|---|---|
| Main Pot Capacity | Varies |
| Thumper | 3 Gallons with 4" Fruit/Access Port (tri-clamp) |
| Worm (Condenser) | 3 Gallons |
| Coil | 3/8" Copper Tubing |
| Seal | Stainless EZ Seal Cap, food-safe silicone gasket & butterfly clamp |
| Material | 20 oz, 99.9% Pure Copper Sheet |
| Joining | You solder with included lead-free solder & flux |
| Tools Needed | Propane tank & torch head (not included), clamps, basic hand tools |
| Warranty | Lifetime Warranty on Copper Components |
| Origin | Proudly Made in the USA |
What Can You Do With This Kit?
- Distilled Water — clean water for home, labs, preparedness.
- Spirits — whiskey, rum, brandy, gin, vodka, and more.
- Essential Oils — botanicals like lavender and mint.
- Culinary Infusions — extracts, vinegars, sauces.
- Ethanol Fuel — for generators or compatible engines.
- Education — hands-on project (chemistry, sustainability).
Understanding Capacity & Output
Units are sold by pot capacity. Example: 20 gallons of mash at 10% ABV can yield about 2 gallons of pure alcohol post-distillation.
Note: “Moonshine still” describes the equipment — it can produce a wide variety of legal products.
Included Efficiency Add-Ons (Advanced EZ KIT)
EZ Seal Cap: Fast, clean, reliable clamp-seal (no flour paste).
4" Thumper Port: Infuse fruits/herbs and simplify cleaning.
Build Help: Booklet & Tutorial Video
Open the Moonshine Kit “Bookitlet” Page
Download the PDF Booklet
Recipes & tips: Mash.Recipes • Accessories: ACW Accessories
Contact & Ordering
Call / Text 24/7: 1-502-337-3944
Email: americancopperworks@gmail.com
Bulk orders, custom builds, and local pickup available. Mention your state for faster service.
Hand-crafted Kit Components in the USA • Lifetime Warranty
We operate multiple East Coast locations (NH, TN, KY, NC, GA). Ask about customer pickup or customizations at 1-502-337-3944.
FREE SHIPPING • 14 Years Experience • 24/7 Support • Booklet & Video Included
Customer Reviews
You might also like